
How to clean cat ears safely starts with knowing when not to clean them. A little wax may be normal, but pain, odor, swelling, heavy dark debris, discharge, head shaking, or constant scratching can mean ear mites, infection, allergy, or another problem that needs a veterinarian.
Oliver reminded me of this with one sharp burst of ear scratching followed by a head shake. I checked the outside of his ear first, not the deep canal. There was mild brown wax, no bad smell, no redness, and no pain when I touched the ear base. That is the kind of situation where gentle home cleaning may be reasonable.
This guide explains a safer four-step routine for routine wax cleaning, what products to avoid, why cotton swabs can make things worse, and which signs mean you should stop and call your veterinarian instead.
Quick Answer: How to Clean Cat Ears Safely?
To clean cat ears safely, first inspect the ear for odor, redness, swelling, pain, discharge, or heavy dark debris. If any of those signs are present, do not clean at home; call your veterinarian. For mild routine wax, use a cat-safe ear cleaner recommended by your vet, apply it only as directed, gently massage the base of the ear, let your cat shake, and wipe only the visible outer ear with cotton balls or gauze.
Never push cotton swabs into the ear canal, never use hydrogen peroxide, alcohol, essential oils, or olive oil, and never treat suspected ear mites or infection with cleaning alone.
Important Veterinary Note
This article is for routine ear-care education only. It is not a diagnosis or treatment plan for ear mites, ear infection, ruptured eardrum, allergies, polyps, wounds, or chronic ear disease. If your cat has pain, strong odor, head tilt, loss of balance, blood, pus, swelling, repeated head shaking, heavy black debris, or one ear that looks very different from the other, contact your veterinarian before cleaning.
Why Cotton Swabs Are Risky in Cat Ears
Understanding how to clean cat ears correctly starts with understanding why the cat ear canal is architecturally different from what most owners imagine when they think about ears.
The human ear canal runs in a relatively straight line from the outer ear to the eardrum. The feline ear canal does not. It consists of a vertical canal that runs downward from the ear opening, then makes an approximately 90-degree turn into a horizontal canal that runs inward toward the Tympanic Membrane (Eardrum) — forming what is called an L-shaped Ear Canal.
This L-shaped geometry is the reason cotton swabs are dangerous in cat ears. When you insert a cotton swab into a cat’s ear and push downward, you reach the bend in the L — and anything on the swab tip at that point is pushed not out of the ear but around the corner and further toward the Tympanic Membrane (Eardrum). You are not cleaning the ear. You are compacting Cerumen (Ear Wax) and debris against the eardrum, where it cannot easily be removed without veterinary equipment.
What the L-shaped geometry means for safe cleaning:
- The horizontal canal cannot be reached by a cotton swab without risk of eardrum damage
- Liquid cleaning solutions, however, can flow around the bend by gravity and distribute throughout the canal
- The massage technique (which we cover in the protocol below) mechanically loosens debris throughout the full canal length — including the horizontal portion that no swab can safely reach
- The cat’s subsequent head shake is not an inconvenience — it is the functional ejection mechanism that brings loosened debris up the vertical canal and out of the ear

Ear Wax, Ear Mites, or Infection: When Not to Clean at Home
Before learning how to clean cat ears, decide whether home cleaning is appropriate at all. You can notice warning signs, but you cannot reliably diagnose ear mites, yeast, bacteria, a ruptured eardrum, or deeper ear disease at home. Veterinarians may need an otoscope exam and microscopic ear swab to identify mites, yeast, bacteria, inflammation, or eardrum problems.
Normal ear findings:
- Small to moderate amount of light tan to medium brown Cerumen (Ear Wax) in the vertical canal
- No odor beyond the mild natural scent of the ear
- No swelling, redness, or sensitivity to gentle palpation at the base of the ear
- Occasional mild scratching — not persistent or frequent
Possible ear mite signs:
Ear mites are the most common cause of otitis externa in cats and produce a characteristic debris pattern:
- Dark brown to black, dry, crumbly debris that looks like coffee grounds or finely ground black pepper
- The debris is present in large quantities relative to normal Cerumen (Ear Wax)
- Intense scratching — often breaking skin around the ear base and pin the area
- Head shaking that is frequent and forceful
- Possible scabbing or hair loss around the ear from self-trauma
Possible infection signs:
- Yellow, green, or gray discharge — abnormal color indicates infection
- Strong, unpleasant odor — one of the most reliable signs of active infection
- Significant redness and swelling of the ear canal visible at the entrance
- Pain response — the cat pulls away or vocalizes when the ear base is touched
- Discharge that is liquid or pasty rather than the dry, waxy consistency of normal Cerumen
The rule I use in my clinical work: If the debris is anything other than light to medium brown and dry-to-waxy in consistency, or if there is any odor, pain, or significant redness, do not attempt home cleaning — take the cat to a veterinarian first. Attempting to clean an actively infected ear without appropriate antimicrobial or antiparasitic treatment first can introduce additional bacteria, rupture an already compromised Tympanic Membrane (Eardrum), and significantly worsen the condition.
These signs do not confirm the cause. They mean the ear should be checked by a veterinarian before you put cleaner into the canal.
If you want a broader monthly monitoring routine, pair ear checks with our cat health check at home guide.
How to Clean Cat Ears Safely in 4 Steps
This is a gentle routine for mild wax maintenance when the ear looks comfortable and your veterinarian has approved home cleaning. The goal is not to deep-clean the canal. The goal is to loosen mild wax, let the head shake bring debris outward, and wipe only what you can see.
What you need before you start:
- Veterinarian-approved ear cleaning solution (more on product selection in the FAQ below)
- Multiple cotton balls — plan for at least 4–6 per ear
- A towel for your lap and for any initial cat-restraint comfort
- High-value treats for reward
- Good lighting — a headlamp or a bright room
The setup — position and restraint:
Sit on the floor or on a low surface with your cat in your lap, facing away from you. For cats who are comfortable with handling, no restraint beyond a gentle hand is necessary. For cats who are head-shy or handling-averse, you must use the same slow desensitization approach we recommend for grooming-resistant cats — building ear-handling tolerance gradually over days to weeks before attempting a full cleaning, rather than attempting to restrain an unwilling cat and creating a negative association with the process.
Step 1: Inspect the Ear Before You Touch It
Hold the ear flap gently between your thumb and forefinger and lift it to expose the entrance to the vertical canal. Look at the visible portion of the ear canal with your light source.
What you are assessing:
- Color of the canal skin — should be pale pink; redness indicates inflammation
- Amount and character of any visible debris — amount, color, and consistency as described in the previous section
- Any visible swelling that narrows the canal opening
- Any odor — bring your nose close to the ear and assess
If anything looks or smells abnormal, stop here and contact your veterinarian rather than proceeding with cleaning.
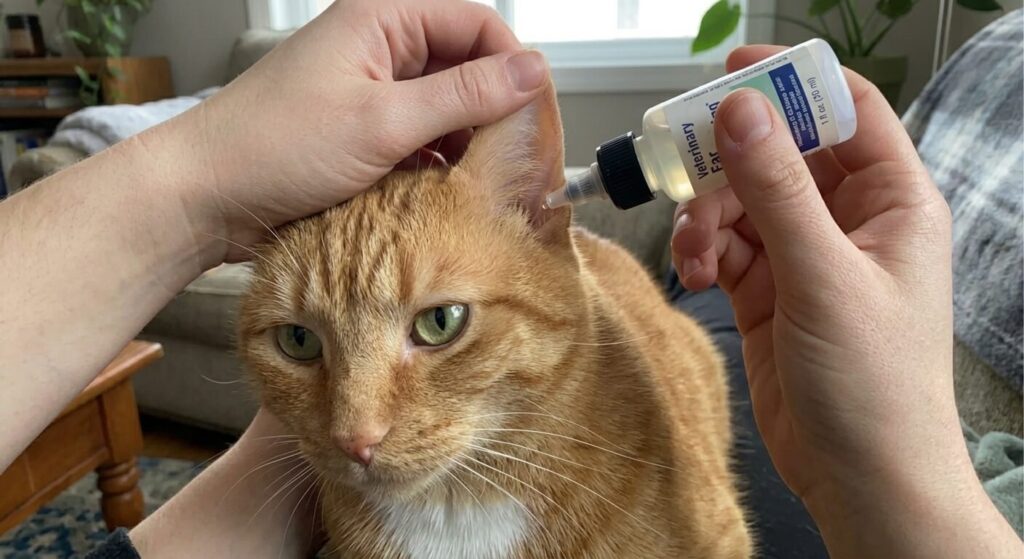
Step 2: Apply the Cleaning Solution
Hold the ear flap in your non-dominant hand to keep the canal entrance accessible. With your dominant hand, insert the tip of the cleaning solution bottle just into the entrance of the vertical canal — no more than 0.5cm — and apply the solution.
How much solution to use:
Follow the product label, but a general guideline for an adult cat is enough solution to fill the vertical canal — you will typically hear a slight liquid sound when the canal is adequately filled. For a standard cat ear, this is approximately 0.5–1ml.
Important: The solution will be cold if stored at room temperature in an air-conditioned apartment. Warming the bottle in your hands for two minutes before application prevents the startle response that a cold liquid entering the ear canal reliably produces.
Step 3: Massage the Ear Base
This is the step that does the actual mechanical cleaning work — and it is the step that owners most often skip or perform inadequately.
Immediately after applying the solution, fold the ear flap down over the ear opening and place your thumb and forefinger on either side of the vertical canal at the base of the ear — the firm cartilage structure you can feel at the junction between the ear and the head. Apply gentle but firm circular pressure and massage continuously for 30 full seconds.
Why 30 seconds matters:
The massage serves two functions simultaneously. The compression and release action breaks up Cerumen (Ear Wax) and debris throughout the full length of the canal — including the horizontal portion that nothing can physically reach. The solution, distributed by massage and gravity around the L-bend, softens and suspends the debris so it can be ejected. Many cats tolerate about 20–30 seconds of gentle massage. If your cat resists, vocalizes, or seems painful, stop rather than forcing the full time.
You will hear a characteristic squishing or sucking sound during effective massage — this is the solution and debris moving through the canal and is a sign that the technique is working correctly.
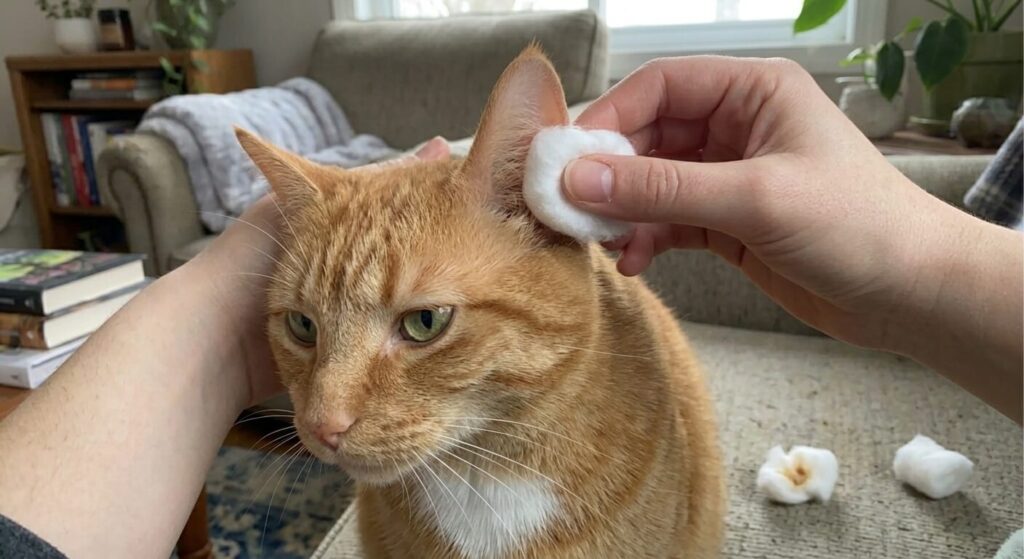
Step 4: Allow the Head Shake, Then Wipe
Release the ear after 30 seconds of massage and step back slightly — your cat will shake their head, and the debris-containing solution will be ejected outward. This is intended and desirable. It is how the loosened material exits the canal.
After the head shake, take a fresh cotton ball and wipe the visible outer ear flap — the pinna — and the entrance to the vertical canal, removing any debris that has been brought to the surface.
Critical technique: Wipe only what you can see. Do not insert the cotton ball into the canal. The canal cleaning has been accomplished by the solution and massage — the cotton ball’s role is to collect the debris that has been brought to the outer ear surface by the head shake and by capillary action.
Repeat with fresh cotton balls until the cotton comes away clean or with only minimal pale tan residue. Multiple passes are normal — Oliver’s ears typically require three to four cotton ball passes per ear before they come away clean.
Repeat the full protocol on the other ear, using fresh materials.
Red Flags: Stop Cleaning and Call Your Vet
Knowing how to clean cat ears at home also means knowing when home cleaning is not the appropriate action — and this knowledge is as important as the technique itself.
Stop cleaning immediately and contact your veterinarian if:
- Strong or foul odor — any unpleasant smell from the ear that is beyond the mild natural scent indicates active bacterial or yeast infection requiring prescription treatment
- Significant pain response — if your cat pulls away sharply, vocalizes, or becomes aggressive when you apply solution or begin massage, the ear may have a ruptured Tympanic Membrane (Eardrum) or active infection that makes cleaning painful and potentially harmful
- Discharge that is not normal Cerumen (Ear Wax) — yellow, green, gray, or blood-tinged discharge requires veterinary assessment before any cleaning
- Visible swelling — a canal that appears swollen or significantly narrowed compared to the other ear
- No improvement after two cleaning sessions — an ear that continues to accumulate excessive debris quickly may have an underlying infection or condition that cleaning alone cannot resolve
- Any debris that looks like coffee grounds — the classic ear mite presentation requires antiparasitic treatment, not cleaning alone
The specific sign I want to emphasize: odor.
In my clinical experience, ear odor is the single most reliable sign that a cat needs veterinary attention rather than home cleaning. A clean ear, even a waxy ear, does not smell bad. An ear with active bacterial or yeast overgrowth produces a distinctive, unpleasant smell that is immediately recognizable. If you smell it, stop the home cleaning protocol and schedule a veterinary appointment.
FAQ
What is the best solution to clean cat ears?
The best solution is the one your veterinarian recommends for your cat’s ears. Different cleaners are designed for different situations, and the wrong product can irritate inflamed tissue or be unsafe if the eardrum is damaged. Products containing chlorhexidine (at appropriate low concentrations), salicylic acid, or malic acid are commonly recommended by veterinary dermatologists for routine maintenance cleaning.
Ear checks fit naturally into a broader grooming routine. For a full maintenance plan, read our indoor cat grooming guide.
Products to avoid include alcohol-based solutions (drying and painful on inflamed tissue), hydrogen peroxide (tissue-damaging and produces excessive foam in the canal), and any product containing neomycin if Tympanic Membrane (Eardrum) integrity is uncertain. Ask your veterinarian to recommend a specific product at your next wellness visit — they can advise based on your individual cat’s ear anatomy and history.
Can I use olive oil to clean my cat’s ears?
Olive oil is sometimes recommended in home remedy contexts, but it is not an appropriate ear cleaning solution for several reasons. Oil does not have the surfactant properties needed to lift and suspend Cerumen (Ear Wax) and debris for ejection — it adds moisture to the canal environment rather than helping debris exit.
Residual oil in the ear canal creates a warm, moist environment that supports bacterial and yeast overgrowth rather than preventing it. Some sources recommend olive oil for the treatment of ear mites specifically, but this is neither the most effective nor the veterinary-recommended treatment for ear mite infestation.
If your cat has ear mites, prescription antiparasitic treatment is required. If you need to clean debris from the outer ear flap only, a damp cotton ball with water is safer and more appropriate than olive oil.
Should I clean my cat’s ears if I see black debris?
Not automatically. Black or coffee-ground-like debris can be associated with ear mites, but it can also appear with wax, yeast, infection, or inflammation. If the debris is heavy, dark, smelly, painful, or paired with scratching and head shaking, schedule a veterinary exam before cleaning.
Can cleaning make a cat ear infection worse?
Yes. Cleaning an infected, painful, swollen, or damaged ear can make irritation worse, push debris deeper, or cause pain. If the eardrum is damaged, some products may be unsafe. That is why odor, pain, discharge, swelling, blood, head tilt, or heavy debris should be checked by a veterinarian first.
How often should I clean cat ears?
Most healthy cats with normal ear anatomy and no history of ear disease require ear cleaning approximately once per month for maintenance — the frequency that Oliver’s ears required based on my own missed month of monitoring.
Cats with a history of recurrent ear infections, cats with heavy or pendulous ear flaps that reduce airflow into the canal, and cats who swim or are bathed frequently may require more frequent cleaning — every two weeks in some cases.
Cats with very clean ears who show no accumulation at monthly inspection can have their cleaning interval extended — there is no benefit to cleaning ears that are genuinely clean, and over-cleaning can disrupt the natural Cerumen (Ear Wax) production that protects the canal lining. Let the inspection guide the frequency rather than applying a fixed schedule regardless of what you find.
Final Thoughts
Learning how to clean cat ears is mostly about restraint in the good sense: inspect first, clean only mild routine wax, avoid cotton swabs in the canal, and stop when the ear looks painful, smelly, swollen, or abnormal.
Oliver’s ears were a routine-cleaning situation: light brown wax, no odor, no redness, no pain, and normal behavior after the cleaning. That is very different from a cat with intense scratching, heavy black debris, discharge, or a painful ear. Home cleaning is useful only when it stays within its lane. When the ear looks abnormal, the safest next step is a veterinary exam.
References
- Zur, G., & Lifshitz, B. (2016). Relationships between the signalment, common causes of canine otitis externa, and the presence of coinfection with multiple microorganisms. Veterinary Dermatology, 27(3), 186-e44. Referenced in the context of otitis externa presentation patterns applicable to feline otology and home ear care protocols. https://doi.org/10.1111/vde.12315
- Nuttall, T., & Cole, L. K. (2007). Evidence-based veterinary dermatology: A systematic review of interventions for treatment of Pseudomonas otitis in dogs. Veterinary Dermatology, 18(2), 69–77. Referenced in the context of ear canal anatomy, cleaning solution selection, and the risks of inappropriate ear cleaning techniques across companion animal species. https://doi.org/10.1111/j.1365-3164.2007.00575.x
- Merck Veterinary Manual. Otitis Externa in Cats.
- Cornell Feline Health Center. Ear Mites: Tiny Critters that Can Pose a Major Threat.
- VCA Animal Hospitals. Ear Cleaning and Administering Ear Medication in Cats.
- VCA Animal Hospitals. Ear Infections in Cats: Otitis Externa.
- Nuttall, T., & Cole, L. K. (2007). Evidence-based veterinary dermatology: A systematic review of interventions for treatment of Pseudomonas otitis in dogs. Veterinary Dermatology, 18(2), 69–77.
-300x169.png)
-300x169.png)
-300x169.png)