By a cat parent who discovered the limits of feline self-sufficiency the hard way.
For the first two years of Oliver’s life, I operated on the comfortable assumption that cats handle their own hygiene completely and that my only grooming responsibility was keeping his food bowl clean. This assumption held up reasonably well right until the morning I found what I can only describe as a disturbingly substantial hairball on my bedroom rug, and then — during a routine petting session that same week — felt something sharp and wrong near Oliver’s back paw.
One of his claws had grown long enough to begin curving toward his paw pad. He wasn’t limping yet, but another week or two and he would have been. Both incidents happened because I had never developed an intentional grooming routine, relying entirely on the myth that cats manage everything themselves. This indoor cat grooming guide exists because that assumption, while flattering to cats, is not entirely accurate — and because the routine I built after those two wake-up calls turned out to be simpler, faster, and less traumatic for both of us than I had feared.
Quick Answer
A complete indoor cat grooming guide covers three non-negotiable routines: brushing the coat one to three times per week to reduce shedding and prevent hairballs, trimming nails every two to three weeks to prevent painful overgrowth and household damage, and using unscented pet-safe wipes for spot cleaning between baths. Unless heavily soiled or managing a specific medical condition, most indoor cats never need a full water bath.
The “Cats Clean Themselves” Myth
Cats are extraordinary self-groomers. That part is true. A healthy adult cat spends 30–50% of their waking hours engaged in grooming behavior — licking their coat, cleaning their face with a moistened paw, nibbling at their claws.
But self-grooming has specific, well-defined limitations that become problems without human intervention.
What cats cannot do through self-grooming:
- Remove all loose undercoat — particularly in medium and long-haired cats, loose dead fur accumulates faster than the tongue can remove it, especially during seasonal shedding cycles
- Prevent hairball accumulation — the fur they do ingest during grooming passes through the digestive system or accumulates in the stomach; brushing removes loose fur before it’s ingested at all
- Trim their own nails — without outdoor surfaces like rough bark and hard earth to wear them down naturally, indoor cat nails grow continuously and can curve painfully into the paw pad if neglected
- Clean skin folds or hard-to-reach areas — particularly in flat-faced (brachycephalic) breeds or obese cats who cannot reach their lower back, base of tail, or hindquarters effectively
- Remove debris from eyes and ears — discharge accumulates at the inner corner of the eyes and in the ear canal regardless of how diligently a cat grooms their face
The other dimension of this myth worth naming directly: excessive grooming can actually be a symptom, not a sign of a healthy, self-sufficient cat. Over-grooming — creating bald patches, raw skin, or obsessive licking sequences — is a common stress response and sometimes a response to skin parasites or pain. If your cat is grooming dramatically more than usual, that’s a vet conversation, not a sign that they’re handling things independently.

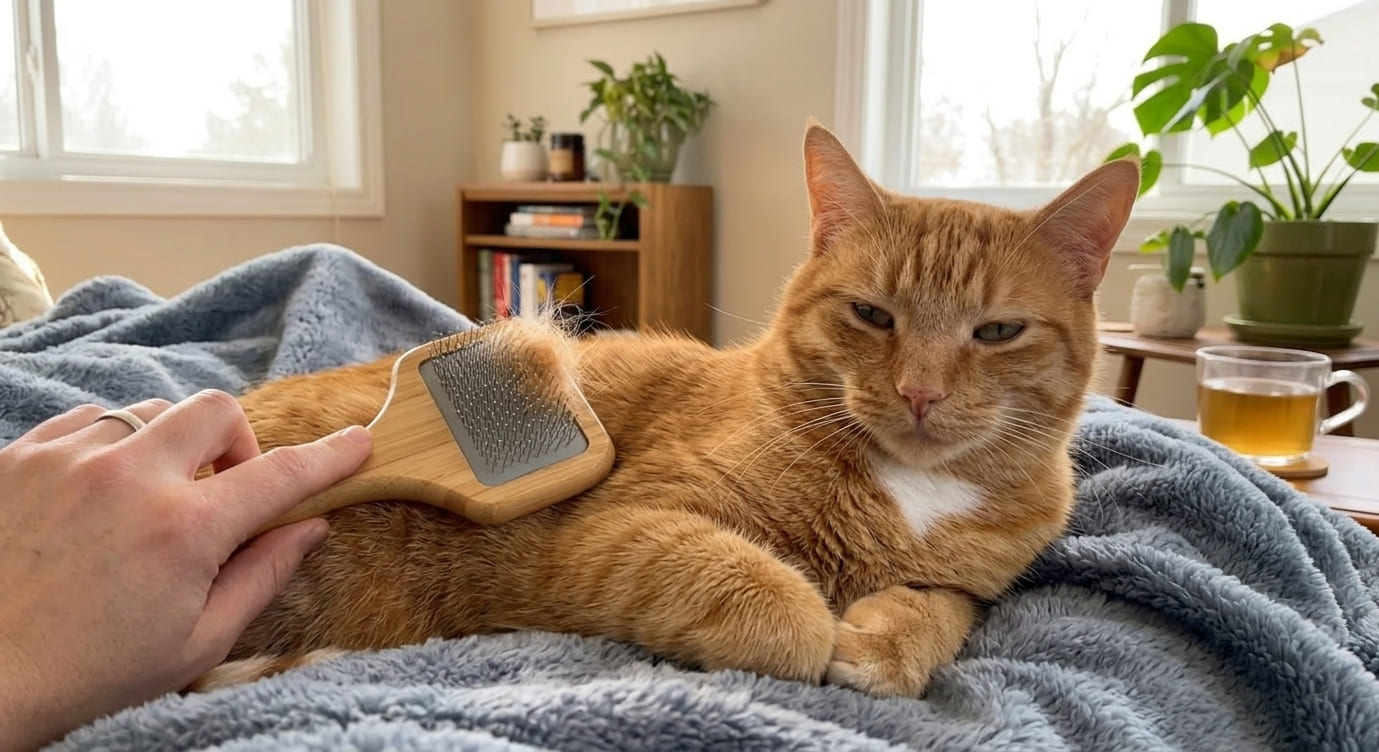
Coat Brushing: Tools, Frequency, and Hairball Prevention
Brushing is the foundation of every other aspect of your cat’s coat health — and it delivers benefits that extend well beyond aesthetics.
What regular brushing actually accomplishes:
- Removes loose dead fur before it’s ingested during self-grooming, directly reducing hairball formation
- Distributes natural skin oils along the hair shaft, improving coat condition and reducing static buildup
- Allows you to examine the skin surface — finding parasites, unusual lumps, sores, or skin changes early
- Reduces ambient shedding — fur that ends up on your brush does not end up on your furniture, your clothes, or floating through your apartment’s air supply
- Builds positive physical handling tolerance that makes every other grooming task easier
An active brushing schedule is the absolute foundation of keeping shedding manageable in a small apartment — and we covered the complete shedding control strategy, including seasonal management and tool selection, in our dedicated guide. [Read our complete guide to controlling cat hair and shedding in a small apartment here → How to Control Cat Hair in a Small Apartment (A Clean-Freak’s Guide)]
Frequency by Coat Type
Short-haired cats (Oliver’s category):
- Once or twice per week during normal periods
- Daily during peak shedding seasons (spring and autumn coat transitions)
- Session length: five to eight minutes is sufficient
Medium-haired cats:
- Two to three times per week year-round
- Daily during shedding seasons
- Pay particular attention to areas prone to matting: behind the ears, under the “armpits,” at the collar line, and at the base of the tail
Long-haired cats (Persians, Maine Coons, Ragdolls):
- Daily brushing is non-negotiable — without it, mats form within days in some coat types
- Session length: ten to fifteen minutes
- Mats that have already formed should be addressed carefully (see mat removal below) — never cut through a mat with scissors without knowing the exact location of the skin beneath
Tool Selection by Coat Type
Slicker brush:
The workhorse of cat brushing. Fine, short wire bristles set in a cushioned pad that flex on contact, reaching into the coat to collect loose fur without scratching the skin.
- Best for: All coat types for general brushing; surface fur removal
- Technique: Long, gentle strokes in the direction of coat growth; light pressure — the bristles do the work, not force
- Maintenance: Clear accumulated fur from the bristle pad after every few strokes, not just at the end
Deshedding tool (undercoat rake):
A tool with wider-spaced, longer teeth designed to reach through the top coat and pull out loose undercoat that a slicker brush cannot access.
- Best for: Double-coated and medium-to-long-haired cats during active shedding periods
- Use with caution: These tools are effective precisely because they pull out substantial fur volume — overuse on a single area can irritate skin; two to three passes over each section is sufficient per session
- Not recommended: For short-haired, single-coat cats in non-shedding periods; the undercoat simply isn’t there in sufficient volume to warrant it
Wide-tooth metal comb:
For long-haired cats after brushing, a metal comb run through the coat identifies any remaining tangles or early-stage mat formation before they consolidate.
- Work through sections methodically from the tip of the fur toward the skin
- If the comb catches a resistance point, address it before proceeding rather than pulling through it
Grooming mitt:
A glove with silicone or rubber nubs on the palm that collects fur through petting motion.
- Best for: Cats resistant to traditional brushes; the motion is indistinguishable from petting, which significantly reduces anxiety
- Less effective than slicker brushes for thorough deshedding, but dramatically better than nothing for resistant cats
How to Handle Mat Removal
Mats are dense tangles of dead fur that have knotted together and compressed against the skin. They are more common in long-haired cats and in areas of friction (collar line, armpits, hindquarters).
Never pull a mat. The skin beneath is often more closely involved with the mat than it appears, and pulling causes pain that creates lasting negative associations with grooming.
For early-stage mats (still soft, not yet compressed):
- Apply a small amount of cornstarch or a detangling product formulated for cats to the mat
- Work the edges of the mat gently with fingers before attempting a comb
- Use a mat splitter or wide-tooth comb to work through from the outer edge inward in small sections
For compressed mats close to the skin:
- This is a job for a professional groomer or veterinary practice
- The risk of cutting the skin with scissors in a home environment is real — the skin tents upward into mats more than is visible from the surface
Nail Trimming: The Stress-Free Method
Oliver’s curved nail was the grooming failure I feel most responsible for, and it is the one I am most determined to help other cat owners avoid.
Indoor cat nails grow continuously without the natural wear that outdoor terrain provides. Without regular trimming, they curve progressively inward — first becoming sharp enough to catch on fabric, then becoming long enough to restrict normal walking posture, and ultimately growing into the paw pad itself, causing pain, infection, and a veterinary procedure that was entirely preventable.
The standard trimming interval: Every two to three weeks for most cats. You will develop a feel for your individual cat’s growth rate — some need trimming every two weeks, some every four.
Understanding Claw Anatomy Before You Cut
This is the knowledge that eliminates the fear of nail trimming.
A cat’s claw contains two distinct zones visible when the claw is extended:
- The clear/white tip — dead keratin with no blood supply or nerve endings; this is what you trim
- The pink quick — the living tissue containing blood vessels and nerves; this is what you absolutely do not cut
In light-colored claws, the quick is clearly visible as a pink shadow inside the nail. In dark or black claws (less common in cats than dogs), the quick is not visible, and you trim conservatively — small amounts from the tip only.
If you cut the quick: It bleeds, it stings briefly, and your cat will remember it. Apply styptic powder (or in an emergency, a small amount of cornstarch) with gentle pressure to the tip. The bleeding stops within two to three minutes. The psychological damage takes longer to repair — which is why technique matters so much.
Tool Selection
Half-moon curved cat nail clippers:
The semi-circular blade opening is designed to match the natural curvature of a cat’s claw, producing a clean cut perpendicular to the nail rather than the crushing, splitting action of plier-style clippers applied to a curved nail.
- Sharp blades are non-negotiable — dull clippers crush and split the nail rather than cutting cleanly, which is uncomfortable and creates rough edges that catch on fabric
- Replace or sharpen when you notice any resistance or nail splitting during the cut
Avoid:
- Human nail clippers — the flat blade orientation doesn’t match claw geometry
- Guillotine-style clippers — acceptable but require more precise positioning than half-moon clippers for most home use
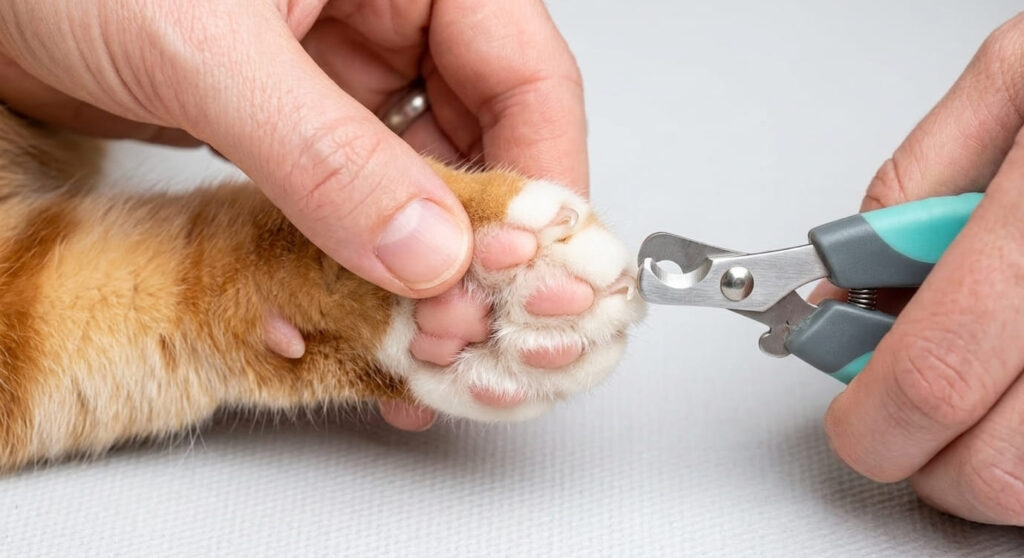
The Step-by-Step Trimming Method
Setup:
- Choose a time when Oliver is calm and relaxed — post-meal, post-play, never when he’s actively alert or playful
- Have good lighting — you need to see the quick clearly
- Keep styptic powder within reach
- Have high-value treats ready for immediate post-trim reward
Extending the claw:
Gently press the top of the paw (the area behind the claw) between your thumb and the pad below with your index finger. The claw will extend naturally — no force required. If Oliver pulls his paw back, release immediately and try again calmly; fighting the retraction creates tension.
The cut:
Position the clipper blade 2–3 millimeters clear of where the pink quick ends — when in doubt, cut less. You can always trim again in two weeks; you cannot un-cut the quick.
Make a single, decisive, smooth squeeze of the clipper handles. A hesitant, slow cut creates more pressure on the nail than a clean confident one.
Per session: All four paws, five claws each (including the dewclaw on the inner front leg, which receives no wear and grows fastest).
The Desensitization Approach for Resistant Cats
If Oliver — or your cat — actively resists nail trimming, the solution is not restraint. It is a graduated desensitization protocol:
Week 1: Handle paws regularly during calm petting sessions with no trimming — simply hold each paw gently for a few seconds and release. Treat and praise.
Week 2: Introduce the clipper as an object — let your cat smell it, touch it, investigate it. Click the clipper near the paw without contact. Treat.
Week 3: Extend one claw, touch the clipper to it without cutting. Release, treat.
Week 4: Trim one or two claws per session — not all at once. Build up to a full trim over several sessions.
The goal is voluntary cooperation, not submission. A cat who tolerates nail trimming because they’ve learned it is brief, non-painful, and followed by something good is infinitely easier to manage than one who associates it with struggle.
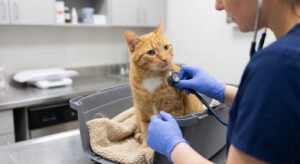
Do Indoor Cats Actually Need Baths? (Spoiler: Mostly No)
This is the grooming question I get most frequently from other cat owners, usually asked with a mixture of hope and dread.
The direct answer: Most healthy indoor cats with short to medium coats will go their entire lives without needing a water bath and be completely fine. Their self-grooming is genuinely sufficient for routine coat maintenance when brushing removes the excess dead fur their tongue can’t handle.
When a Bath Is Actually Necessary
There are specific, non-routine situations where a bath becomes appropriate:
- Heavy soiling — if your cat has gotten into something oily, toxic, or heavily soiled that self-grooming cannot resolve safely
- Flea treatment — some veterinary-recommended flea treatment protocols involve a bath as a component
- Specific skin conditions — seborrhea, ringworm, or other dermatological conditions may involve medicated shampoo as part of treatment
- Pre-show grooming — for cats being prepared for conformation showing, a bath may be part of coat preparation
- Very obese or arthritic cats who cannot reach their hindquarters — occasional gentle spot cleaning with warm water or pet wipes becomes necessary
If You Do Need to Bathe Your Cat
- Use water temperature that matches your inner wrist comfort — not hot, not cold; lukewarm
- Use cat-specific shampoo only — human shampoo disrupts the pH balance of feline skin, and many human shampoos contain compounds toxic to cats
- Never use dog flea shampoos on cats — permethrin, which is safe for dogs, is acutely toxic to cats
- Support the cat’s weight fully during the bath; a cat who feels unsupported panics
- Keep water away from ears — water in the ear canal creates a warm, moist environment ideal for bacterial growth
- Dry thoroughly with a warm towel immediately; cats chill quickly when wet and are resistant to blow dryers (use the lowest heat setting at distance if necessary)
The Spot-Cleaning Alternative
For isolated soiling — a dirty tail tip, a muddy paw, residue around the eyes or hindquarters — unscented pet-safe wipes handle the issue without the full bath trauma for your cat and your bathroom.
Keep a pack accessible for:
- Eye discharge buildup in the inner corner — wipe gently outward, never inward toward the eye itself
- Dirty hindquarters after litter box use — particularly relevant for long-haired cats
- Dusty or soiled paws after particularly vigorous window perch activity
Product note: Always choose wipes specifically formulated for cats and labeled unscented. Scented wipes contain fragrance compounds that irritate feline skin and respiratory passages, and many contain alcohol or other compounds that are inappropriate for cat skin contact.
Ear and Eye Maintenance
These two areas receive the least attention in most grooming guides and cause a disproportionate number of preventable veterinary visits when neglected.
Ear Care
What you’re looking for during routine checks:
- Normal: Light tan or pale brown waxy residue in the visible outer canal; no odor beyond a faint warm smell
- Abnormal: Dark brown or black debris (associated with ear mites), strong or yeasty odor (associated with bacterial or yeast infection), redness or swelling of the ear canal lining, head shaking, pawing at ears, or tilting the head to one side
Routine maintenance:
- Check ears weekly during brushing sessions — fold the ear flap back gently and examine the visible outer canal with good lighting
- If light residue is present, wipe the outer canal gently with a cotton ball moistened with a veterinary ear cleaning solution — use the cotton ball, not a cotton swab; cotton swabs risk pushing debris deeper and contacting the eardrum
- Never insert anything into the ear canal beyond the visible outer section
For cats with large or folded ears (Scottish Folds, American Curls) — check more frequently, as the altered ear architecture reduces airflow and increases the rate of wax and debris accumulation.
Eye Care
Normal: Clear, bright eyes with no significant discharge; a small amount of dried material at the inner corner is normal after sleep
Abnormal: Persistent watery discharge, thick or colored (yellow, green) discharge, cloudiness of the cornea, squinting, or pawing at the eye
Routine maintenance:
- Use a fresh, moistened cotton ball or unscented pet wipe to gently wipe dried discharge from the inner corner outward — always wipe away from the eye, never across the surface of the eye
- Use a separate cotton ball for each eye to prevent cross-contamination
- Any persistent, colored, or copious discharge warrants a vet call — eye conditions progress quickly and some require prescription treatment
Flat-faced breeds (Persians, Exotic Shorthairs) have a much higher rate of eye discharge due to their altered tear drainage anatomy and require daily eye cleaning as a baseline maintenance routine.
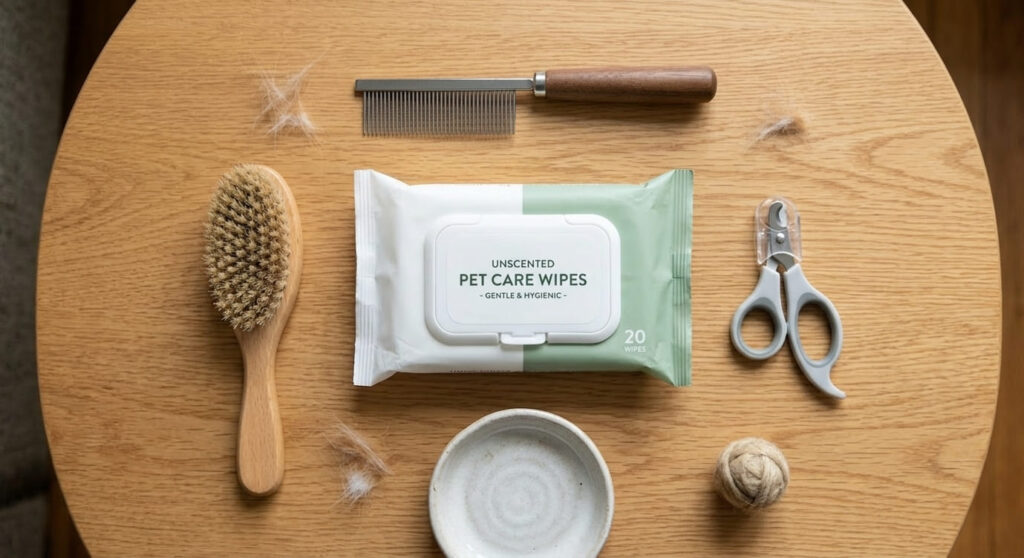
Your Complete Indoor Cat Grooming Guide Toolkit
Based on Oliver’s grooming routine and several years of testing what actually gets used versus what collects dust, here is the minimum viable toolkit for an indoor cat:
Non-Negotiable Items
| Tool | Use | Frequency |
|---|---|---|
| Soft slicker brush | Coat brushing, fur removal | 1–3× per week |
| Half-moon curved nail clippers | Nail trimming | Every 2–3 weeks |
| Metal wide-tooth comb | Tangle detection, finishing (long coats) | 1–2× per week |
| Unscented pet wipes | Spot cleaning, eye and face cleaning | As needed |
| Cotton balls | Ear cleaning, eye cleaning | Weekly check |
| Styptic powder | Quick-cut bleeding control | Emergency use |
Situational Additions
- Deshedding undercoat tool — for medium/long-haired cats or during peak shedding seasons
- Grooming mitt — for cats resistant to traditional brushes
- Veterinary ear cleaning solution — for cats with higher ear wax production
- Mat splitter — for long-haired cats prone to early-stage mat formation
What You Don’t Need
- Full grooming tables (a lap or a non-slip mat on a counter works perfectly)
- Professional-grade blow dryers (most indoor cats never need baths)
- Electric clippers (professional groomer territory; home use risks skin cuts)
- Elaborate restraint devices — these replace the relationship-based cooperation that makes grooming sustainable long-term
Building the Grooming Habit
The most effective grooming routine is the one that happens consistently, not the most elaborate one that happens occasionally.
I keep Oliver’s entire grooming kit in a single small basket on a shelf he can see — the visual consistency means the tools are never a surprising new object that triggers wariness. The basket comes down, he gets brushed, it goes back. Three to five minutes, twice a week, plus nail trims every three weeks. The whole routine, including positive reinforcement treats at the end, runs under ten minutes total.
Even with perfectly trimmed nails, cats retain a fundamental biological need to scratch — not just for claw maintenance but for scent marking and the physical satisfaction of the stretching movement — which is why providing appropriate vertical scratching surfaces is a non-negotiable part of a complete indoor enrichment setup, separate from the grooming routine itself. [Read our complete guide to building an enriching indoor environment that meets all of your cat’s physical and behavioral needs here → The Small Apartment Cat Survival Guide: 7 Pillars of Indoor Enrichment]
FAQ
1. Is there an indoor cat grooming guide approach that works for cats who hate being touched?
The most effective indoor cat grooming guide approach for touch-sensitive cats is a systematic desensitization protocol that works backward from the goal. Start with whatever touch your cat currently accepts — perhaps a hand resting briefly on their back — and build from there in tiny increments over weeks. Introduce grooming tools as neutral objects before they touch your cat: leave the brush near their food bowl, let them rub against it voluntarily, let them smell the nail clippers during calm interaction.
The grooming mitt is the single most useful tool for touch-averse cats because the motion is indistinguishable from petting. For cats with severe handling sensitivity, a conversation with your vet about whether anxiety medication during grooming sessions is appropriate is worth having — some cats’ quality of life genuinely improves when grooming is no longer a source of significant stress.
2. How do I cut my cat’s nails if they absolutely hate it?
Start by completely separating the desensitization process from the actual trimming timeline — don’t try to trim anything until your cat accepts paw handling without tension. Practice extending a claw without any clipper present, reward immediately, release. Introduce the clipper sound (click it near your cat without contact) as a positive event paired with treats. When you do begin trimming, do one claw per session if that is all your cat will accept, and build up over weeks.
Trim during the deepest post-meal relaxation you can find. Two trimmers working together — one person handles and distracts, one person trims — is dramatically more effective than solo trimming for resistant cats. If home nail trimming remains genuinely impossible after patient desensitization attempts, a veterinary practice or professional groomer can handle trims quickly and with less accumulated tension than extended home battles.
3. My cat throws up hairballs frequently. Will brushing actually help?
Yes, meaningfully and measurably. The hairballs your cat produces are composed of fur ingested during self-grooming — fur that the tongue pulled from the coat and swallowed rather than shedding externally. Regular brushing removes that loose fur before it reaches the tongue, directly reducing the volume of fur ingested per grooming session and consequently reducing the frequency of hairball formation.
Research published in the Journal of Feline Medicine and Surgery (Cannon, 2013) examined hairball formation in domestic cats and identified coat management as a primary preventive factor. For cats with frequent hairball issues despite regular brushing, additional interventions include hairball-formula foods (with added fiber to aid gut passage), petroleum-based hairball lubricant gels, and increasing dietary moisture (wet food) to improve overall gastrointestinal transit.
Hairballs occurring more than once weekly, or any episode where your cat appears to be retching without producing a hairball, warrants a veterinary assessment — this can indicate an underlying gastrointestinal issue rather than simple hairball accumulation.
References
- Cannon, M. (2013). Hair balls in cats: a normal nuisance or a sign that something is wrong? Journal of Feline Medicine and Surgery, 15(1), 21–29. https://journals.sagepub.com/doi/10.1177/1098612X12464465
- American Society for the Prevention of Cruelty to Animals (ASPCA). (n.d.). Cat Grooming Tips. https://www.aspca.org/pet-care/cat-care/cat-grooming-tips
Disclaimer: This article reflects the personal experience of a cat owner and draws on published veterinary and grooming science. It is not a substitute for professional veterinary assessment. If you notice any skin abnormalities, persistent ear or eye discharge, unusual nail growth, or behavioral changes during grooming, please consult a licensed veterinarian promptly.