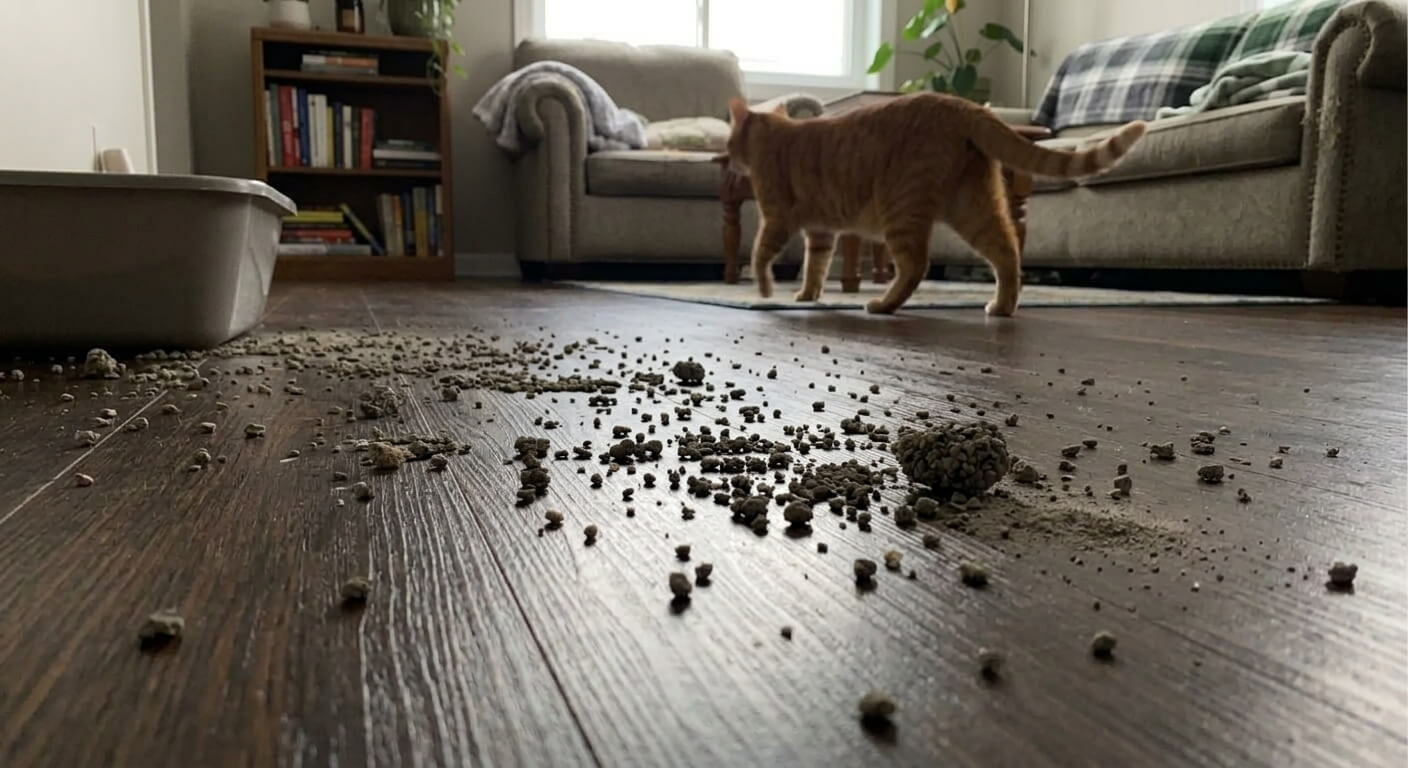
Stop cat litter tracking apartment mess by fixing the path your cat takes after leaving the box. Tracking is not just “messy paws.” It is a system problem: litter texture sticks to paws, the box exit points the cat into open floor, the mat is too small or unpleasant, and the cleaning routine lets small granules spread through the apartment.
The best way to stop cat litter tracking apartment mess is a three-step system: choose a lower-tracking litter your cat will still use, improve the box design, and create a soft runway mat that catches granules without hurting paws. Then place the box so the cat exits across the mat, not directly into the room.
Do not choose a rough mat or sudden litter change that makes your cat avoid the box. Clean floors matter, but litter box acceptance matters more.If your cat starts avoiding the area, read our guide to why cats pee outside the litter box.

Quick Answer
The best way to stop cat litter tracking apartment mess is a three-step system: choose a lower-tracking litter your cat will still use, improve the box design, and create a soft runway mat that catches granules without hurting paws. Then place the box so the cat exits across the mat, not directly into the room.
Do not choose a rough mat or sudden litter change that makes your cat avoid the box. Clean floors matter, but litter box acceptance matters more.
Table of Contents
Why Tracking Happens
Litter safety note: if your cat starts avoiding the box, straining, crying, urinating outside the box, or producing blood or very little urine, contact your veterinarian. Do not assume tracking fixes are more important than litter box comfort or urinary health.
Tracking happens along a route, so the fix must also be a route. If your cat exits the box and immediately steps onto open floor, even a good mat cannot work.
Texture is the hidden variable. A mat that feels sharp or unstable may protect the floor while teaching the cat that the litter area is unpleasant. Comfort comes first.
The best tracking setup combines litter texture, box design, mat size, and placement. Changing only one piece can help, but the system works best when all three cooperate.
A useful stop cat litter tracking apartment plan should fit the way people actually live in apartments. That means limited storage, shared walls, small bathrooms, tight hallways, landlord rules, busy workdays, and a cat who may spend almost every hour inside the same rooms. Advice that ignores those constraints may sound good but fail by Tuesday.
The first step is to identify what the reader is really trying to solve. Is this a safety issue, a behavior issue, a cleaning issue, a space issue, a product-choice issue, or a medical-adjacent issue? Once that is clear, the rest of the article can stay focused instead of becoming a loose list of tips.
Most tracking problems come from one of three sources: the litter, the exit path, or the cleaning gap.
The litter problem happens when granules are small, dusty, lightweight, or sticky enough to cling to paw pads and toe fur. The exit-path problem happens when the cat steps directly from the box onto open floor, carpet, or a hallway. The cleaning-gap problem happens when loose litter sits on the floor long enough to spread under shoes, socks, paws, or vacuum airflow.
Before buying anything, watch your cat leave the box two or three times. Notice:
- which side of the box your cat exits from
- whether your cat walks, jumps, or runs out
- whether litter falls off in the first few steps
- whether the mat is actually in the walking path
- whether most litter is scatter from digging or tracking from paws
This quick observation helps you choose the right fix. A bigger mat helps if your cat steps onto it. A different litter helps if granules stick to paws. A high-sided box helps if the mess is mostly from digging.
The 3-Step Apartment Tracking Plan
The best way to stop cat litter tracking apartment mess is to control the path your cat takes after leaving the box. Tracking usually happens because litter sticks to paws, the box exit points straight into open floor, the mat is too small, or the cleaning routine lets small granules spread.
Instead of changing everything at once, fix the problem in this order:
- choose a lower-tracking litter your cat will still use
- guide your cat across a better exit path
- use a mat and cleaning routine that catches litter before it spreads
For a broader small-space cleaning system, see our litter box odor cleaning guide, which covers odor, mats, floor residue, and apartment cleaning routines.
Step 1: Choose a Lower-Tracking Litter
Some litter tracks more than others. Very fine granules can stick to paws and fur, especially if your cat jumps out of the box quickly or walks across hard floors immediately after using it.
Lower-tracking litter usually has one or more of these traits:
- larger granules
- heavier particles
- lower dust
- stronger clumps that break apart less
- less lightweight scatter
Clumping clay can control odor well, but some formulas track heavily. Tofu, pellet, or larger-grain litters may track less, though they can feel different under your cat’s paws.
Do not switch suddenly if your cat is sensitive. Mix the new litter gradually with the old litter and watch whether your cat still enters the box normally. A lower-tracking litter is not a good fix if it causes box avoidance.
Best for:
- apartments with hard floors
- cats that jump out quickly
- boxes near hallways or living rooms
- owners who vacuum litter daily
Watch out for:
- sudden litter changes
- rough textures
- scented formulas
- litters your cat refuses to dig in
When comparing litter, do not judge only by what stays inside the box. Pay attention to what happens in the first six feet after your cat exits. In apartments, those first few steps often decide whether litter stays near the box or reaches the sofa, rug, bed, or hallway.
A simple test is to clean the floor, scoop the box, and watch the area for one day. If most litter appears right outside the box, the exit path and mat are the main issue. If granules appear several rooms away, the litter is probably sticking to paws or toe fur.
For long-haired cats, check the fur between the toes. Fine litter can cling there even when the box and mat are well placed. If paw fur is part of the problem, ask your groomer or veterinarian about safe trimming rather than cutting it yourself.
Step 2: Fix the Exit Path From the Box
Tracking gets worse when your cat leaves the box and steps directly onto open floor. The goal is to create a short “runway” that catches granules before your cat reaches the rest of the apartment.
Start by looking at the direction your cat naturally exits. Many owners put a mat in front of the box, but the cat may step out from the side or jump over the mat completely.
To fix the exit path:
- turn the box so the exit points toward the mat
- use furniture or walls to gently guide the path
- avoid blocking the cat or making the box feel trapped
- keep the exit area wide enough for comfortable movement
- place the mat where the cat actually steps, not where it looks neat
If your cat avoids the new layout, undo the change and try a softer adjustment. The best litter setup is one your cat uses without hesitation.
The best exit path gives your cat two to four normal steps before reaching open floor. One tiny mat directly in front of the box is often not enough, especially if your cat takes a long step, jumps, or exits from the side.
In a small apartment, you can guide the path without making the area feel trapped. Try:
- turning the box so the opening faces a mat
- placing the box beside a wall so the cat exits in one direction
- using a larger mat that extends beyond the front of the box
- leaving enough space for the cat to turn comfortably
- keeping the exit path away from food, water, and sleeping areas
Avoid forcing the cat through a narrow tunnel or blocking escape routes. Cats are more likely to avoid a litter area if it feels cramped, noisy, or hard to leave.
Step 3: Use the Right Litter Mat and Cleaning Routine
A litter mat works only if it is large enough, comfortable enough, and placed in the real exit path. Tiny mats often fail because the cat takes one step and then carries litter across the room.
For most apartments, a good mat should be:
- large enough for several steps
- soft enough that your cat will walk across it
- easy to shake, vacuum, or rinse
- stable on the floor
- placed directly in the exit path
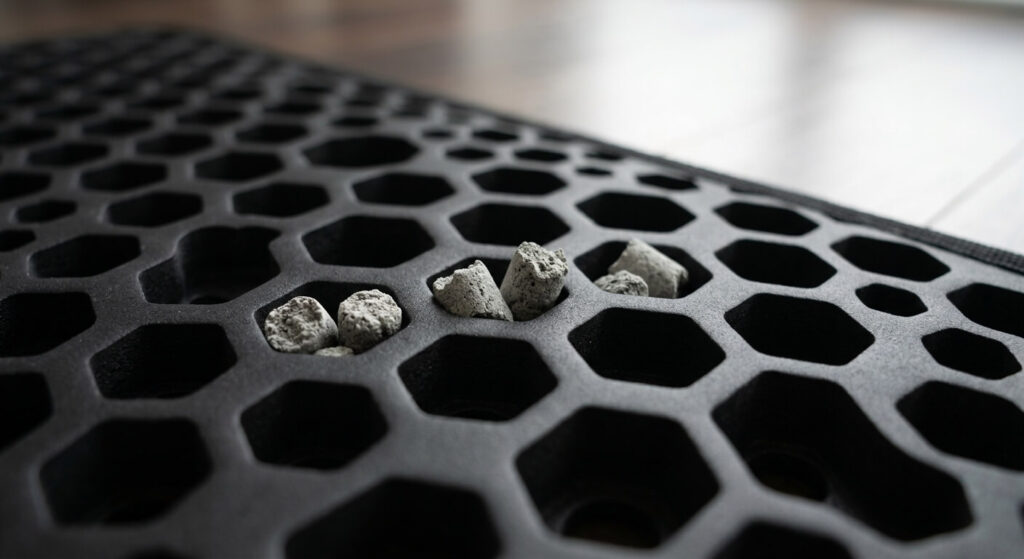
Honeycomb mats can trap granules well, but some cats dislike the texture. Soft microfiber mats may be more comfortable, but they can hold odor or be harder to deep clean. Silicone mats are easy to wipe but may catch less litter depending on the granule size.
The mat also needs maintenance. Shake or vacuum it regularly, and wash it if odor or dust builds up. A dirty mat can become part of the problem.
Mat size matters more than many owners expect. A mat that catches only one step will not stop tracking from a cat who carries litter for four or five steps. For most apartments, choose the largest mat your space can comfortably handle.
Different mat styles solve different problems:
- honeycomb mats trap loose granules well
- microfiber mats are softer for sensitive paws
- silicone mats are easy to wipe and rinse
- ridged mats can help with scatter but may bother some cats
If your cat jumps over the mat, the mat is either uncomfortable, too small, or placed in the wrong spot. Move the mat to the real landing zone and choose a softer texture if needed.
The mat must also be cleaned. A full mat stops trapping new litter because the surface is already covered. Shake, vacuum, or empty it before it becomes a second source of floor mess.
Best Setup by Apartment Type
The right tracking setup depends on the layout of the apartment. A studio needs a different approach than a one-bedroom or multi-cat home because the walking path after the litter box is different.
The goal is always the same: keep litter inside one controlled zone. The more open the floor plan, the more important the exit path, mat size, and daily floor reset become.
Studio Apartment
In a studio, the litter box is usually close to daily living space. Use a larger mat than you think you need, angle the box exit away from the bed or couch, and choose a low-dust litter that does not scatter easily.
A covered or hidden setup may look cleaner, but do not trap odor or make the box hard to access. Tracking control should not come at the cost of box comfort.
One-Bedroom Apartment
A bathroom, laundry corner, or hallway nook can work well if there is enough space for a litter mat runway. Keep the mat out of the door swing and avoid placing the box so your cat exits directly into a high-traffic path.
If litter still spreads into the bedroom or living room, the exit direction is probably the issue, not just the mat.
Multi-Cat Apartment
Multi-cat homes need more cleaning and more space around the box. If two cats share one litter area, tracking builds faster because more paws pass through the same exit path.
Use multiple boxes when possible, and place mats at each exit. If one cat digs aggressively, jumps out, or scatters litter, choose a setup that solves that cat’s behavior instead of assuming all cats track the same way.
Comparison Table
| Fix | Best for | Watch out for |
|---|---|---|
| Lower-tracking litter | Fine litter that sticks to paws | Sudden texture changes can cause avoidance |
| Larger litter mat | Litter spreading across floors | Mat must be placed where the cat actually exits |
| High-sided box | Digging and scatter | Seniors or kittens may need easier entry |
| Top-entry box | Strong scatter control | Some cats refuse top-entry designs |
| Daily vacuum or sweep | Hard floors and small apartments | Cleaning helps but does not fix poor setup |
| Box direction change | Cats bypassing the mat | Do not make the box feel trapped |
Use the comparison table as a troubleshooting tool, not a shopping list. If your main problem is litter scattered around the box, start with box height and mat placement. If your main problem is litter in the bed, couch, or hallway, start with litter type and exit path.
Change one variable at a time. If you change the litter, box, mat, and location on the same day, you will not know what helped or what made your cat uncomfortable.
A good test period is seven to fourteen days unless your cat refuses the box. If your cat avoids the box, urinates outside the box, or seems stressed by the change, undo the change and return to the setup your cat used reliably.
Common Mistakes
Mistake 1: Buying Before Observing
Before buying a new mat or box, watch how your cat exits the box. If your cat steps out from the side, jumps over the mat, or runs straight into the hallway, a small front mat will not solve the problem.
Mistake 2: Choosing a Mat Your Cat Avoids
A rough mat may catch litter, but it can also make your cat jump over it. Comfort matters. If your cat avoids stepping on the mat, choose a softer texture or a different placement.
Mistake 3: Changing Litter Too Suddenly
A lower-tracking litter is useful only if your cat accepts it. Sudden changes can lead to avoidance or accidents. Transition slowly and keep the box familiar.
Mistake 4: Solving for the Human Only
A hidden or tightly boxed-in setup may look better, but it can make the litter area stressful. Cats need easy access, enough space to turn, and a clean exit path.
Mistake 5: Ignoring Cleaning Frequency
Even the best mat will fail if it is never cleaned. Litter that collects in the mat can get kicked back onto the floor. Shake, vacuum, or wash the mat on a schedule.
Troubleshooting: If Tracking Still Happens
If tracking continues after changing the mat and litter, check these points:
- Is your cat exiting from a different side of the box?
- Is the mat too small?
- Is the litter too fine or lightweight?
- Is the box too shallow for your cat’s digging style?
- Is your cat jumping over the mat?
- Is long paw fur holding granules?
- Is the surrounding floor cleaned often enough?
For long-haired cats, litter can stick between toe fur. Regular paw and foot-fur checks may help, but do not trim unless you know how to do it safely or your groomer/veterinarian recommends it.
If tracking suddenly gets worse, check for behavior changes too. A cat who rushes out of the box may be startled, uncomfortable, or unhappy with the box location.
If the first fix does not work, identify the type of mess before making another change.
If litter is piled near the box, the problem is usually digging, kicking, or shallow box walls. A high-sided box or better mat placement may help.
If litter is scattered in a trail away from the box, the problem is usually paw carry. A lower-tracking litter, larger mat runway, or toe-fur check may help.
If litter appears everywhere by the end of the day, the problem may be maintenance. The mat may be full, the floor may need a daily reset, or the box may be placed in a high-traffic path where people spread granules further.
If your cat suddenly rushes out of the box, avoids stepping on the mat, or starts eliminating outside the box, treat that as a comfort problem first. Do not keep adding barriers or rough textures around the box.
Maintenance Schedule
Daily
Sweep or vacuum the immediate area around the litter box. Shake loose litter from the mat if it collects quickly. Scoop the box so your cat is not digging through old waste.
Weekly
Vacuum or wash the litter mat, wipe the floor around the box, and check whether the mat has shifted away from the real exit path.
Monthly
Review the whole setup. If litter is still spreading, change only one thing at a time: mat size, box direction, litter type, or box style. This makes it easier to know what actually helped.
A low-tracking setup only works if the capture zone stays clean. In apartments, small amounts of litter spread quickly because there is less distance between the litter box and daily living areas.
Keep a small broom, handheld vacuum, or mat-cleaning tool near the litter area. The easier the reset is, the more likely you are to do it daily.
If you use a robot vacuum, schedule it after your cat’s most common litter box times, not during them. Some cats dislike noise near the litter area, and a stressful box area can create bigger problems than tracking.
Frequently Asked Questions
1. What is the single most effective way to stop cat litter tracking apartment floors if I can only change one thing?
If you can only change one thing, start with the litter type. Very fine, lightweight clay granules tend to stick to paw pads and travel farther across hard floors. Larger pellets, lower-tracking clay, tofu litter, or paper-based litter may reduce how far litter moves after your cat leaves the box.
That said, the best choice is the litter your cat will actually use. Do not switch suddenly. Mix the new litter with the old one gradually and watch for hesitation, box avoidance, or accidents.
If your cat mainly scatters litter by digging, kicking, or peeing high on the wall of the box, litter type alone may not solve it. In that case, pair the litter change with a better box design. For kickers and stand-up pee cats, see our best high-sided litter box guide.
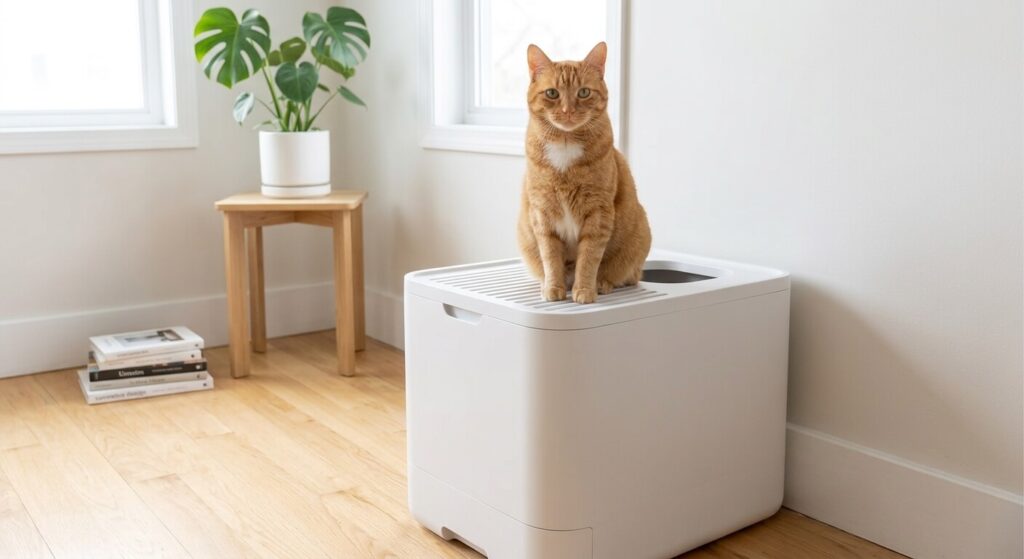
2. Will my cat actually use a top-entry litter box?
Some healthy adult cats adapt to a top-entry litter box within a few days, but not every cat likes the design. Top-entry boxes can reduce scatter because the cat has to climb out over the lid, but they may be uncomfortable for senior cats, overweight cats, large cats, kittens, or cats with joint pain.
If you want to try one, place it beside the current box and keep both available during the transition. Do not remove the old box until your cat is consistently using the new one.
If your cat avoids the top-entry box, choose a high-sided open box or a larger litter mat instead. Also avoid strong fragrances or harsh cleaners around the litter area. Use cat-safe floor cleaners when cleaning nearby floors so the box area still feels comfortable to your cat.
3. I have tried litter mats before and they stopped working within a week. What am I doing wrong?
The mat may be filling up faster than you clean it. Once the capture surface is covered with old litter, new litter lands on top of trapped litter instead of falling into the mat or staying on the surface. At that point, the mat stops working well.
Try shaking or vacuuming the mat daily for a week. If that helps, the issue was maintenance, not the idea of using a mat.
If daily cleaning is not realistic, consider a dual-layer honeycomb mat. These mats let captured litter fall through the top layer into a lower compartment, which keeps the walking surface clearer for longer. They still need cleaning, but they usually stay effective longer than a flat mat in high-tracking homes.
4. What is the fastest way to stop cat litter tracking in an apartment?
The fastest fix is to place a larger, comfortable litter mat directly in the path your cat uses when leaving the box. If your cat steps around or jumps over the mat, adjust the box direction so the exit leads across the mat.
5. What litter tracks the least?
Larger-grain, low-dust, and heavier litters usually track less than very fine lightweight litter. Tofu, pellet, crystal, and some low-tracking clay litters may help, but the best choice depends on what your cat will actually use.
6. Do high-sided litter boxes stop tracking?
High-sided boxes can reduce scatter from digging, but they do not always stop paw tracking. If litter sticks to your cat’s paws, you still need a good exit path and mat.
7. Will my cat use a top-entry litter box?
Some cats use top-entry boxes well, but others refuse them. Senior cats, kittens, large cats, or cats with mobility issues may find them uncomfortable. Introduce one carefully and keep the old box available during the transition.
8. Can a rough litter mat make cats avoid the box?
Yes. If a mat feels sharp, unstable, or unpleasant, some cats will jump over it or avoid the area. Choose a mat that catches litter but still feels comfortable under paws.
9. Why is litter still everywhere even with a mat?
The mat may be too small, placed in the wrong direction, or too uncomfortable for your cat to walk across. Watch your cat leave the box and place the mat where the paws actually land.
10. How often should I clean the litter mat?
Shake or vacuum the mat daily if tracking is heavy. Wash it weekly or whenever it starts holding odor, dust, or damp litter residue.
Quick Apartment Tracking Checklist
Use this checklist when litter keeps leaving the box area.
Check the litter:
- Is it fine, dusty, or lightweight?
- Does it stick to paw pads?
- Does your cat still like the texture?
- Did you transition slowly?
Check the exit path:
- Which direction does your cat actually leave?
- Does your cat step on the mat or jump over it?
- Is the mat large enough for several steps?
- Does the box opening point toward the mat?
Check the box:
- Is the box too shallow for your cat’s digging style?
- Would a high-sided box reduce scatter?
- Is the entry still easy for your cat?
- Is the box location comfortable and accessible?
Check the cleaning routine:
- Is the mat emptied before it fills up?
- Is loose litter swept daily?
- Is the floor around the box easy to clean?
- Is the litter zone separate from food and water?
If you can answer these questions, you can usually fix tracking without buying several products at once.
Final Thoughts
stop cat litter tracking apartment is not about making the apartment perfect. It is about making the home easier for your cat to use safely and predictably. The best solution answers the searcher’s immediate question, respects the limits of apartment living, and keeps the cat’s welfare at the center.
Start with observation, make one practical change, and watch how your cat responds. If the pattern involves sudden behavior change, pain, appetite loss, litter box problems, breathing changes, or weakness, bring your veterinarian into the decision. A good apartment system supports daily life, but it does not replace medical care.
References
- Sung, W., & Crowell-Davis, S. L. (2006). Elimination behavior patterns of domestic cats (Felis catus) with and without elimination behavior problems. American Journal of Veterinary Research, 67(9), 1500–1504. https://avmajournals.avma.org/view/journals/ajvr/67/9/ajvr.67.9.1500.xml
- Neilson, J. C. (2004). Feline house soiling: elimination and marking behaviors. Veterinary Clinics of North America: Small Animal Practice, 34(4), 1023–1039. https://www.sciencedirect.com/science/article/abs/pii/S019556160400054X
- AAFP/ISFM Environmental Needs Guidelines. https://journals.sagepub.com/doi/10.1177/1098612X13477537
- Cornell Feline Health Center: Litter Box Problems. https://www.vet.cornell.edu/departments-centers-and-institutes/cornell-feline-health-center/health-information/feline-health-topics/litter-box-problems
- VCA: House Soiling in Cats. https://vcahospitals.com/know-your-pet/house-soiling-in-cats
-300x169.png)
-300x169.png)
-300x169.png)