By Oliver’s Mom | Certified Veterinary Technician & Disaster Preparedness Specialist


Introduction: The 3 AM Wake-Up Call I Was Not Ready For

The fire alarm hit at 3:07 AM on a Wednesday in February.

I came out of a dead sleep, hit the floor, and did exactly what every disaster preparedness professional tells you never to do: I panicked. My plan — my deeply confident, completely untested plan — was to just grab Oliver and go. I had said those exact words to myself. “I’ll just grab Oliver.” As if Oliver would be standing at the door with his carrier already zipped, ready to evacuate like a cooperative golden retriever.

Oliver was under the bed in approximately two seconds flat.

Not near the edge. Not peeking out. Under. Pressed against the baseboard in the farthest corner of a queen-sized bed frame with a solid wooden base, in the dark, while a 110-decibel alarm screamed through every wall in the building. I spent four minutes on my stomach with a flashlight trying to reach a cat who had essentially become structural architecture.

As a certified veterinary technician, I have seen the clinical aftermath of smoke inhalation in animals who didn’t make it out in time. I’ve watched owners arrive at the emergency clinic without their pets, shaking, because they couldn’t find them in the chaos. I know that a cat emergency evacuation isn’t a matter of love or intention — it is a matter of tactical preparation executed before the alarm ever sounds. Love does not get a cat out from under a bed in under 90 seconds. A system does.

That night, my building’s alarm turned out to be a sensor malfunction. Oliver emerged from under the bed 40 minutes later, deeply unimpressed. I spent the following week building the most comprehensive cat emergency evacuation plan I have ever assembled — the same plan I now share with every apartment-dwelling cat owner I work with.

This guide is that plan.


Quick Answer: How to Create a Cat Emergency Evacuation Plan?

A successful cat emergency evacuation plan for apartments relies on a pre-packed ‘Go-Bag,’ a carrier staged for immediate access, and a reliable ‘hider retrieval’ technique (like the towel wrap). Prioritize stairwell-safe transport, maintain digital medical records, and use pheromones to reduce the acute panic that leads to cats bolting.


The 3-Minute Window: Why Hiding Is a Death Trap

Three minutes. That is the average time before a residential room fire reaches flashover — the point at which every combustible surface in the space ignites simultaneously. In a high-rise apartment building, the calculus is slightly different due to fire suppression systems and compartmentalization, but the evacuation urgency remains absolute.

Your cat does not know any of this.

What your cat knows is that a terrifying, overwhelming noise has erupted in their safe territory, and their entire nervous system is screaming one word: hide. A cat’s primary instinct during sudden loud noise or environmental crisis is to seek the smallest, most enclosed, darkest space available. This is not disobedience. This is millions of years of prey-animal survival programming activating at full intensity — a high-arousal fear response we explored in full physiological detail in our feline anxiety guide .

The hiding instinct is neurologically automatic. You cannot argue with it, override it with affection, or outrun it. The only way to manage it during a cat emergency evacuation is to design your preparedness system around the certainty that it will happen.

The math of the 3-minute window in a cat-occupied apartment:

  • 0:00 — Alarm activates. You wake from sleep.
  • 0:08 — Cat identifies alarm as threat and initiates hide response.
  • 0:10 — Cat is fully concealed.
  • 0:45 — You locate the cat.
  • 1:30 — You attempt manual extraction from hiding spot.
  • 2:45 — You successfully extract cat using no pre-planned method.
  • 3:00 — You still need to open the carrier, load the cat, secure it, grab the go-bag, and reach the exit.

This timeline doesn’t work. It doesn’t work without a plan, without pre-staged equipment, and without a rehearsed extraction protocol. Smoke inhalation — which causes respiratory epithelial damage, carbon monoxide poisoning, and systemic hypoxia — begins affecting cats within minutes of exposure because their smaller lung capacity and faster respiratory rate accelerates toxin uptake dramatically compared to humans.

The 3-minute window is not a metaphor. It is a biological and physical reality that your preparedness plan must defeat.


7 Critical Steps: How to Execute a Cat Emergency Evacuation Successfully


Step 1: The ‘Cat Go-Bag’ (72-Hour Survival Essentials)

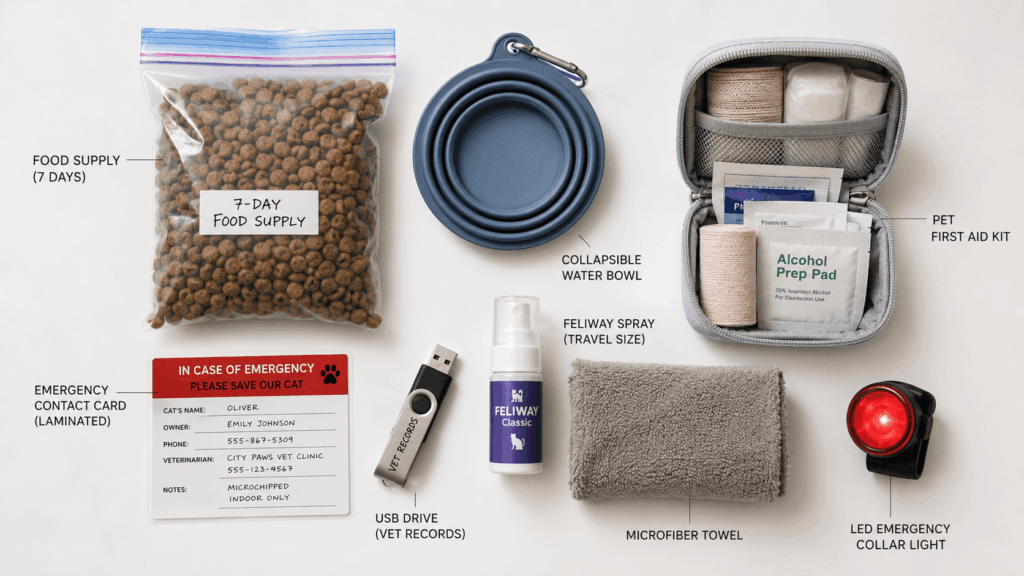
The Go-Bag is the non-negotiable foundation of every cat emergency evacuation plan. It must be packed, sealed, positioned at your exit point, and never raided for daily supplies.

The principle is absolute: your Go-Bag is not storage. It is a sealed emergency deployment system.

The Complete Cat Go-Bag Checklist:

Food and Water:

  •  72-hour supply of your cat’s specific food (dry in a sealed Ziploc, or 6 pouches of wet food)
  •  Collapsible silicone water bowl
  •  One 500ml sealed water bottle
  •  Manual can opener if using canned food

Medical Supplies:

  •  7-day supply of any prescription medications in original labeled bottles
  •  Basic feline first aid kit (gauze, medical tape, saline wash, styptic powder, nitrile gloves)
  •  Rectal thermometer (normal feline temperature: 100.5–102.5°F)
  •  Activated charcoal tablets (consult vet — for potential toxin ingestion in evacuation environments)

Identification and Documentation:

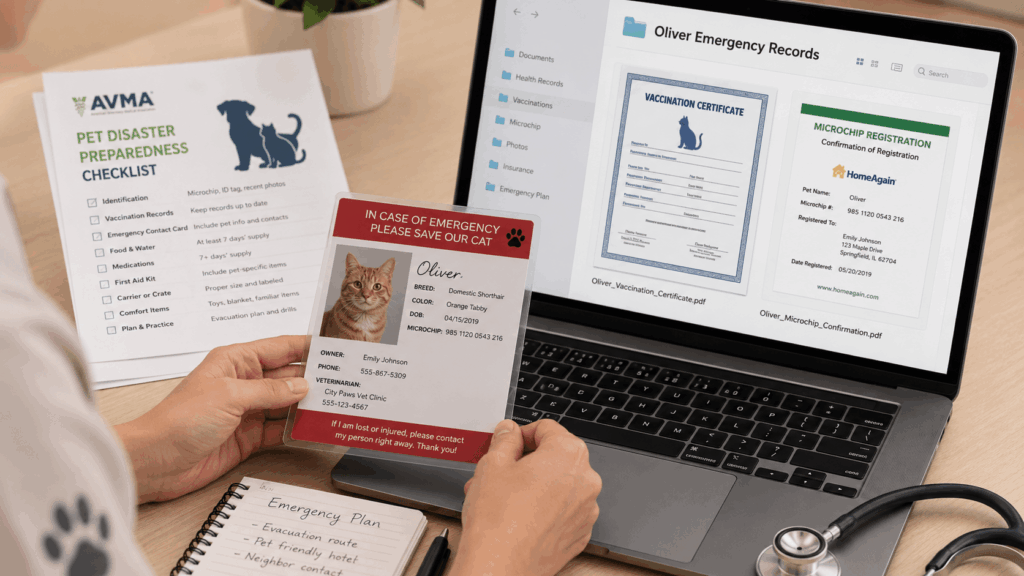
  •  Waterproof USB drive containing: vaccination records, microchip registration, vet contact, insurance policy, current photo of your cat
  •  Laminated paper copy of all the above (tech fails in emergencies)
  •  Current photo of yourself with your cat (proves ownership at emergency shelters)

Comfort and Chemical Calm:

  •  Travel-sized Feliway Classic spray
  •  Pre-dosed Gabapentin in labeled container (requires advance vet prescription — more in Step 7)
  •  One unwashed item of your clothing in a sealed bag (scent anchor)
  •  Familiar blanket or carrier pad in a sealed bag

Containment and Safety:

  •  Breakaway travel collar with current ID tag and contact information
  •  6-foot leash with secure snap clip
  •  Red LED emergency light clip (attaches to collar for visibility in dark stairwells)
  •  Two cable ties for carrier reinforcement

Sanitation:

  •  Small collapsible litter pan
  •  One quart-sized bag of clumping litter
  •  10 biodegradable waste bags
  •  Travel-sized enzymatic cleaner (Nature’s Miracle spray)
  •  6 nitrile gloves

Bag selection: Choose a dedicated backpack or duffel in a bright, distinct color that lives exclusively at your exit point — beside your front door, never in a closet. I use a red 35L hiking pack. It is impossible to miss in the dark and carries everything including a carrier if needed.

Review and restock protocol: Check expiration dates on food and medications every six months — set a phone calendar reminder for April and October.


Step 2: Strategic Carrier Staging

Your carrier is your most critical piece of evacuation equipment, and where it lives determines whether you use it.

The single most common failure point in cat emergency evacuation scenarios is a carrier that is stored in a closet, under a bed, or on a high shelf. In darkness, under alarm noise, in sleep-impaired cognitive function, retrieving a stored carrier takes an average of 45–90 seconds before you have even opened it. That time does not exist in your 3-minute window.

The Strategic Staging Protocol:

  • Position: The carrier lives open, accessible, and stationed within arm’s reach of your front door at all times — not during emergencies, not seasonally. Always.
  • Orientation: Open the carrier with the top-loading hatch facing up. A top-loading carrier allows one-handed, gravity-assisted loading of a distressed cat without requiring you to push them in from the front against their resistance. For a comprehensive review of top-loading and crash-tested carrier options suitable for emergency evacuation, see our complete cat carrier guide.
  • Interior staging: Keep the carrier permanently lined with a familiar-scented blanket and a spritz of dried Feliway. This serves the dual purpose of Acclimatization (your cat enters it voluntarily during daily life, reducing its threat association) and immediate emergency readiness.
  • The Acclimatization strategy: Feed your cat one meal per week inside the open carrier. Let Oliver choose to sleep in it. The carrier should have zero Negative Association attached to it — it should read as a familiar, safe den, not a vet-trip trap.

Carrier specifications for high-rise evacuation:

  • Hard-sided with top-loading access — non-negotiable for rapid loading
  • Seatbelt-compatible — you will eventually reach a vehicle
  • Carry handle reinforced for one-handed transport — your other hand holds the go-bag, opens doors, and navigates stairwells
  • Minimum dimensions: 18″L x 12″W x 12″H for cats up to 12 pounds
  • Weight: Under 5 pounds empty — stairwell evacuation with a loaded carrier is physically demanding

Step 3: The ‘Hider’ Extraction Protocol (The Towel Method)

If you have already followed our guide on [Internal Link to ID: 106] how to train a cat to come, you may be able to skip the physical extraction entirely.

This is the step that the 3 AM alarm taught me I desperately needed.

The Towel Method is a veterinary-standard handling technique adapted for emergency extraction of a fear-hiding cat. It works on the neurological principle of proprioceptive compression — gentle, firm, all-body contact that activates calming pressure receptors and briefly overrides the full flight response.

Pre-staging requirements:
A designated thick microfiber towel — minimum 24″x48″, kept folded on top of your go-bag at all times. Not in a drawer. Not in the bathroom. On the bag.

The Extraction Protocol (practice this before you need it):

If cat is accessible under furniture:

  1. Kill the overhead lights if alarm lighting allows — darkness slightly reduces arousal
  2. Drop to your stomach. Do not crouch — it reads as predatory
  3. Approach from the side, not head-on. Speak in a continuous, low monotone — not calling their name repeatedly (repetitive high-pitched calling escalates feline anxiety)
  4. Slide the open towel flat across the floor toward the cat
  5. When the towel edge reaches the cat, use a continuous, confident scooping motion to gather the cat against your chest in the towel — wrap the towel fully around their body including their paws
  6. Hold the wrapped cat firmly against your sternum with one forearm. The compression is calming. The darkness inside the towel wrap reduces visual stimulation.
  7. Transfer immediately to the top-loading carrier in one motion — lower the cat in towel-and-all, close the hatch

If cat is behind appliances or inside enclosed spaces:

  • Use the towel as a barrier — slide it behind the cat to block retreat deeper into the space
  • Never reach into an enclosed space with a bare hand in pursuit of a fear-response cat — bite and scratch wounds in this context are severe and deep
  • If the space is too confined, skip extraction and move to emergency services notification (your Neighbor Alliance plan — see Step 6)

Practice this monthly with Oliver in a non-emergency context. I do a monthly “drill” — I set a timer, deploy the towel, and practice the loading sequence. Oliver now loads in under 25 seconds. That number used to be four panicked minutes.


Step 4: Vertical Logistics (Elevator Bans and Stairwell Safety)

High-rise evacuation during a fire emergency operates under one absolute rule: elevators are prohibited.

This is not a suggestion from your building management. In an active fire event, elevator shafts become chimney flues, electrical systems fail unpredictably, and elevator cars have been documented to open directly into fire floors. Linear Evacuation — moving in a single, continuous, downward direction via stairwells — is the only survivable protocol.

What this means for cat emergency evacuation logistics:

  • You will carry a cat in a carrier, a go-bag, and navigate fire doors in stairwells that may be dark, crowded, and smoke-filled
  • This is a physical demand you should assess honestly and prepare for specifically

Stairwell survival checklist:

  •  Know your building’s stairwell locations — both primary and secondary. Walk them now, in daylight, so the path is physically memorized.
  •  Keep a small headlamp (not just a phone flashlight) in your go-bag. Both hands may be occupied with the carrier.
  •  Attach the red LED emergency light to Oliver’s collar before entering the stairwell — if the carrier opens accidentally, he is visible in darkness
  •  Wet the microfiber towel and place it over the carrier ventilation if smoke is present — it provides minimal but meaningful filtration
  •  Crouch lower in stairwells if smoke is present — smoke rises, and the lower foot of air near the stairs is significantly cleaner

At ground level:

  • Move to your building’s designated assembly point — know this address in advance
  • Never re-enter the building
  • Keep the carrier zipped and on the ground — do not open it in an outdoor, unsecured environment regardless of how distressed your cat sounds

The carrier-to-vehicle sequence:
If evacuation leads to vehicle transport, the carrier must be seatbelt-secured before the vehicle moves. A Fomite Contamination risk also exists — smoke particles and chemical residue from fire suppressant foam can contaminate carrier exteriors. Wear gloves when handling the carrier exterior in a post-fire environment and decontaminate the carrier exterior before your cat contacts the unprotected surface.


Step 5: Digital Paperwork (ID, Microchips, and Records)

In the chaos following a cat emergency evacuation, your ability to prove ownership, access medical records, and locate your cat if separated determines outcomes in ways that owners rarely anticipate until it is too late.

The Three-Layer Documentation System:

Layer 1 — Physical ID (on the cat):

  • Breakaway collar with current ID tag: your name, phone number, and “INDOOR CAT — PLEASE CONTAIN” engraved
  • Microchip: The only permanently reliable identification. If your cat is not microchipped, schedule this appointment this week. The procedure takes 10 seconds and costs approximately $45–$75 at most veterinary clinics.
  • Confirm your microchip registration is current — the chip is useless if the registration database has an old phone number or address. Check your registration at Found Animals Registry or your chip manufacturer’s database annually.

Layer 2 — Digital Records (immediately accessible):

  • Waterproof USB drive in your go-bag containing:
    • Current vaccination certificate (rabies certificate especially — required for emergency shelter admission in most jurisdictions)
    • Microchip number and registration confirmation
    • Photograph of your cat’s face and markings (used for lost pet reports)
    • Photograph of you with your cat (proves ownership)
    • Veterinary contact and after-hours emergency clinic address
    • Insurance policy number and contact
    • Any prescription medication details with dosing instructions

Layer 3 — Cloud Backup (accessible from any device):

  • Upload all documents to a Google Drive or iCloud folder shared with one trusted contact
  • Use a pet health app (PetDesk, VitusVet) that stores records digitally and allows emergency access without internet if previously cached

What happens if you and your cat become separated during evacuation:

  • File a report immediately with your local animal control agency and any emergency shelter operating in the area
  • Post on Nextdoor, local Facebook lost pet groups, and PawBoost within one hour
  • Your microchip registration and photographic documentation are your recovery tools — without them, reunification in disaster scenarios drops significantly

Step 6: Neighbor Alliances (The ‘In Case of Absence’ Plan)

The most dangerous cat emergency evacuation scenario is not the one where you are home. It is the one where you are not.

A daytime fire, a sudden medical event, a work emergency that keeps you away overnight — your cat is alone, and the building alarm is sounding. Without a neighbor alliance, your cat’s survival depends entirely on a first responder who may or may not prioritize animal extraction.

Building the Neighbor Alliance:

Step 1: Identify two neighbors — one on your floor, one in an adjacent unit — who are willing to participate in a mutual pet emergency agreement. Ideally, choose neighbors who are frequently home or have flexible schedules.

Step 2: Provide each ally with:

  • A spare key to your apartment (or building-approved key card)
  • A laminated instruction card containing: your cat’s name, hiding locations (under the bed, behind the washing machine — be specific), the carrier location, and the Go-Bag location
  • Your emergency contact number and your vet’s number
  • A signed letter confirming they have permission to enter and transport your cat on your behalf

Step 3: Create a digital version of this instruction card and share it via text message with your allies so they can reference it without a physical card in an emergency.

Step 4: Post a Pet Rescue Alert sticker on your apartment front door and your building mailbox. These are available free from the ASPCA and from most local fire departments. The sticker tells first responders:

  • Number and species of pets inside
  • Primary owner contact number
  • Veterinary contact number

The reciprocity protocol:
Your neighbor alliance works because it is mutual. Offer the same key, instruction card, and rescue commitment for their pets. Mutual investment makes the system reliable.

Update your alliance annually — after any move, change in cat count, or change in neighbor circumstances.


Step 7: Calm-Down Chemicals (Feliway and Gabapentin Staging)

Chemical intervention is the final and frequently overlooked layer of a complete cat emergency evacuation plan — and as a vet tech, it is the layer I feel most qualified to address directly.

Acute fear during evacuation events does not simply resolve when the physical threat ends. A cat in a full sympathetic nervous system activation — cortisol flooded, pupils fully dilated, heart rate elevated — remains in that physiological state for hours after the stressor. In a post-evacuation scenario (a car, a temporary shelter, an unfamiliar building), unmanaged acute stress leads to:

  • Escape attempts that result in loss
  • Inappropriate elimination that disqualifies cats from some emergency shelters
  • Fomite Contamination risk via self-trauma (scratch wounds, bite wounds from self-directed aggression)
  • Immune suppression that makes them vulnerable to secondary illness within 48–72 hours

The Two-Chemical Protocol I keep staged in my Go-Bag:

Chemical 1 — Feliway Classic Spray:

  • Application: Two sprays inside the carrier, on the blanket, 15–30 minutes before a known stressor, or immediately upon carrier loading in an emergency
  • Mechanism: Synthetic F3 facial pheromone that signals territorial safety to the feline olfactory system
  • Availability: Over-the-counter, no prescription required
  • Go-Bag staging: One travel-sized bottle, replaced every 12 months

Chemical 2 — Pre-Staged Gabapentin:
This requires advance planning and a veterinary relationship, but it is entirely achievable.

Speak with your veterinarian and request an emergency evacuation prescription — a small supply of pre-dosed Gabapentin (typically 50–100mg per dose, species and weight dependent) kept in your Go-Bag specifically for emergency use.

The administration protocol in an evacuation scenario:

  • If evacuation is imminent but not yet active (building alarm, early warning): administer orally immediately — onset is 60–90 minutes
  • If evacuation is already in progress: administer at the earliest safe opportunity (in vehicle, at shelter) — it will reduce the duration and intensity of the acute stress episode even if not given pre-event
  • Always inform the receiving veterinary clinic or shelter that Gabapentin has been administered and at what time

Store Gabapentin in a clearly labeled, sealed container in your Go-Bag. Check expiration dates every six months during your Go-Bag review protocol.


Post-Evacuation Care: Monitoring for Smoke Inhalation

The emergency does not end when you exit the building. For cats who were exposed to smoke — even briefly, even in a building where the fire was contained — the risk of Smoke Inhalation injury requires active monitoring for a minimum of 72 hours.

Cats are disproportionately vulnerable to smoke toxicity for two reasons:

  1. Respiratory anatomy: Their small airway diameter means inflammatory swelling from chemical exposure causes rapid, significant airflow restriction
  2. Grooming behavior: Soot and chemical particulate that deposits on fur is ingested during post-evacuation grooming, creating a secondary toxin exposure event that owners rarely anticipate

The 72-Hour Post-Evacuation Monitoring Protocol:

Immediate (0–4 hours post-exposure):

  •  Assess respiratory rate — normal is 15–30 breaths per minute at rest. Count for 60 seconds.
  •  Observe for coughing, wheezing, or labored breathing (flank heaving, open-mouth breathing)
  •  Check mucous membranes (gums) — should be pink and moist. White, blue, or bright red gums indicate emergency.
  •  Wipe down your cat’s coat with a damp cloth before allowing grooming — this removes surface soot and chemical residue
  •  Offer water immediately and monitor intake

Warning signs requiring immediate emergency veterinary evaluation:

  • Open-mouth breathing or panting at rest
  • Respiratory rate above 40 breaths per minute
  • Blue or white gum color (cyanosis or shock)
  • Continuous coughing or gagging
  • Neurological signs: wobbling, disorientation, seizure activity (carbon monoxide exposure)
  • Sudden collapse or loss of consciousness

Short-term (24–72 hours):

  •  Monitor appetite — a cat who refuses food for more than 24 hours post-evacuation requires veterinary assessment
  •  Watch for signs of upper respiratory infection — Smoke Inhalation damages the mucociliary clearance mechanism that protects airways from pathogens
  •  Contact your veterinarian within 24 hours of any confirmed smoke exposure, even in the absence of obvious symptoms — subclinical injury is common and treatable when caught early
  •  Monitor litter box output — normal urination and defecation are reliable wellness indicators

The veterinary clinic visit checklist for post-evacuation:
Bring your USB drive with medical records. Inform the clinic of:

  • Duration and intensity of smoke exposure
  • Any Gabapentin or other medications administered
  • Behavior changes since evacuation
  • Last food, water intake, and litter box activity

Frequently Asked Questions

What should be in a cat emergency kit?

A complete cat emergency kit — what I call the Go-Bag — should contain a 72-hour food and water supply, all prescription medications with a 7-day buffer, a basic feline first aid kit, a waterproof USB drive with medical records and microchip information,

a travel-sized Feliway spray, a pre-prescribed supply of Gabapentin (coordinated with your vet in advance), a collapsible litter pan with litter, biodegradable waste bags, a breakaway collar with current ID tag, a 6-foot leash, an LED emergency clip light for the collar,

a large microfiber towel for extraction, and a laminated emergency contact card. The entire kit should be packed, sealed, and staged at your exit point — reviewed and restocked every six months without exception.


How do I get a hiding cat out during a fire?

The most effective method is the Towel Extraction Protocol — a thick, large towel slid flat along the floor beneath or around the hiding cat, gathered into a confident full-body wrap, and used to transfer the cat directly into a top-loading carrier in one continuous motion.

Never reach bare-handed into an enclosed space after a fear-response cat — bite wounds in this context are deep and serious. Drop to stomach level to reduce your predatory visual profile, speak in a continuous low monotone rather than calling the cat’s name repeatedly, and approach from the side rather than head-on.

Monthly practice drills in a non-emergency context will reduce your extraction time from several minutes to under 30 seconds. If extraction is impossible within 60–90 seconds, prioritize your own evacuation and immediately notify firefighters at ground level that a cat is inside — provide the room location and your spare key if available.


Can I use a backpack carrier for evacuation?

Yes — with specific conditions. A backpack carrier is genuinely excellent for high-rise stairwell evacuation because it keeps both hands free for navigating fire doors, railings, and crowd movement. However, it must meet several requirements to be appropriate:

it must have rigid structural sides (not purely soft-sided, which can compress against your back and restrict your cat’s breathing and posture), it must have multiple ventilation panels including rear-facing mesh that is not blocked by your back, and it must have a secure locking closure that cannot be pawed open.

Check the internal temperature of any backpack carrier periodically during evacuation — body heat transfer from your back combined with limited airflow can create dangerous heat accumulation. A backpack carrier is best used as your primary evacuation carrier only; transfer to a seatbelt-compatible hard-sided carrier once you reach a vehicle for ongoing transport.


Scientific and Emergency Management References

¹ Heath, S. E., Linnabary, R. D. (2015). Challenges of managing animals in disasters in the U.S. Animals, 5(2), 173–192. https://doi.org/10.3390/ani5020173

² American Veterinary Medical Association (AVMA). (2023). Saving the Whole Family: A guide to developing community-based pet and service-animal disaster plans. AVMA Disaster Preparedness Resource. https://www.avma.org/resources/pet-owners/emergencycare/pets-and-disasters


Final Thoughts: The Drill That Changed Everything

Oliver emerged from under that bed 40 minutes after the February alarm, sat in the center of the room, and looked at me with the specific expression of a cat who knows he has just made a point.

He was right. He had made a catastrophically important point.

cat emergency evacuation plan built on love and good intentions and the phrase “I’ll just grab him” is not a plan. It is a wish. And in the 3-minute window that separates a safe evacuation from an unsurvivable one, wishes are not a functional currency.

The Go-Bag is packed. The carrier is open beside the front door. Oliver has eaten three meals inside it this month and currently uses it as an afternoon nap location. My neighbor has a key, a laminated instruction card, and the specific knowledge that Oliver hides behind the washing machine. The Feliway is in the bag. The Gabapentin is prescribed, labeled, and dated. The towel is folded on top.

I have run the drill. I know the stairwell. I know the assembly point.

If that alarm sounds tonight at 3 AM, I am ready. More importantly — Oliver is ready, even if he doesn’t know it yet.

Build your plan before you need it. The 3-minute window doesn’t wait for good intentions.


This guide is intended for educational and preparedness planning purposes. Always consult your veterinarian regarding specific medications and your cat’s individual health status. In an active fire emergency, follow all instructions from emergency services personnel. Human safety is always the absolute priority.


Tags: cat emergency evacuation, cat disaster preparedness, pet go-bag, smoke inhalation in cats, high-rise pet safety, cat carrier for evacuation, apartment cat safety

Share this post

Subscribe to our newsletter

Keep up with the latest blog posts by staying updated. No spamming: we promise.
By clicking Sign Up you’re confirming that you agree with our Terms and Conditions.

Related posts